That gap rarely comes down to the tool you chose. It comes down to setup, settings, and what happens before you press record.
This guide covers everything your team needs to produce desktop training recordings that look professional, distribute cleanly, and actually teach something.
Key Takeaways
- Plan one clear learning outcome per video before opening any software
- Audio quality directly affects retention — budget for an external microphone before anything else
- Record at 1080p minimum; use MP4 with H.264 encoding for LMS distribution
- Always run a 60-second test recording before your real session
- Desktop recording works best for software walkthroughs, not conceptual or behavioral training
What You Need Before Recording Your Desktop for Training Videos
Hardware and Software Requirements
You don't need a high-end workstation, but you do need enough headroom to record without lag. Here's what the major tools require:
| Tool | Minimum RAM | CPU Guidance | Cost |
|---|---|---|---|
| Camtasia | 8 GB (16 GB recommended) | Intel 8th Gen+ or AMD Ryzen 2000+ | Annual subscription |
| Loom | 8 GB (16 GB recommended) | Intel 6th Gen+ or Apple M1+ | Free starter; paid plans available |
| OBS Studio | Not specified | DirectX 10.1-compatible GPU | Free and open source |
| Windows Snipping Tool | — | Built-in Windows 11 | Included with OS |
Note: OBS explicitly states that meeting basic hardware requirements doesn't guarantee smooth recording — actual performance depends on encoder, resolution, frame rate, and scene complexity.
Beyond the computer itself, two decisions matter most:
- Microphone: Built-in laptop mics introduce room echo and inconsistent levels. A dedicated USB microphone has a measurable impact on learning outcomes. A 2022 Texas Tech study found mean knowledge test scores of 4.25 for high-quality audio versus 3.52 for low-quality audio.
- Webcam overlay: Only add a picture-in-picture camera feed if your training format calls for it. For pure software walkthroughs, it's often unnecessary clutter.
Desktop and Environment Readiness
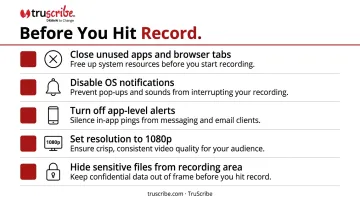
Before every recording session, run through this checklist:
- Close all browser tabs and applications not needed for the demo
- Disable OS-level notifications (Focus Assist on Windows, Do Not Disturb on Mac)
- Turn off app-level notifications — email badges, Slack pings, calendar alerts
- Set screen resolution to match your export target (1080p standard)
- Hide personal files, bookmarks, or anything sensitive from the visible recording area
One issue that catches people off guard: Windows display scaling at 125% or 150% can cause UI elements to render blurry or shifted in screen captures. TechSmith documents this directly. If you're recording on a high-DPI monitor, set scaling to 100% or match your capture settings to your display configuration before starting.
Always run a 30–60 second test recording before the real session. This catches wrong microphone selection, room echo, and notification sounds before they become a problem.
How to Record Your Desktop for Training Videos: Step by Step
Step 1 — Plan the Recording Before Opening Any Software
The most common mistake training teams make isn't technical — it's structural. They sit down, open the recorder, and start talking through an entire workflow in one video.
The fix is simple: one video, one learning outcome.
A video covering five software steps across three different screens will run long, get skipped, and be nearly impossible to update later. A video showing exactly how to submit a purchase request in four steps is something employees will actually complete — and something you can swap out the moment the UI changes.
Before recording, write at least a bullet-point outline of what you'll say. The narration should drive the screen action, not follow it. If you're clicking through screens and then explaining what you just did, viewers are already lost.
Step 2 — Configure Your Recording Software and Audio
With your outline ready, configure these settings before starting:
Audio:
- Select your external microphone as the input source — not the system default
- Monitor input gain levels; aim to keep peaks below -6 dBFS to avoid distortion
Recording region:
- Full screen works for multi-step workflows; application window capture is cleaner for single-tool demos
- Confirm which monitor is being captured on multi-display setups
Output settings:
- Record at 1080p minimum (4K if you plan to zoom into fine UI details during editing)
- Use 30fps for standard UI walkthroughs; 60fps for fast-moving interactions
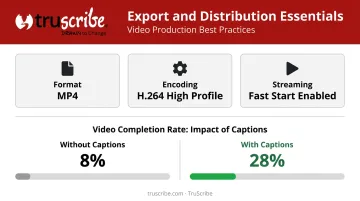
- Format: MP4 — it's the most compatible output for LMS platforms and video hosting tools
Record at higher quality and downsample in editing — you lose flexibility the moment you start at your target resolution.
Check CPU usage before you start. If your system is already running heavy, the recording will show lag even if playback looks smooth.
Step 3 — Deliver and Record the Session
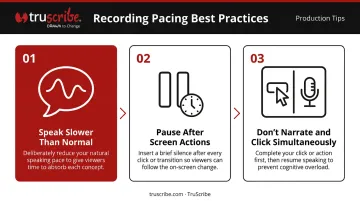
Pacing is where most recordings fall apart. Three habits that help:
- Speak slightly slower than normal conversation — what feels too slow to you sounds natural on playback
- Pause briefly after completing a screen action before narrating it — this gives viewers time to see what happened
- Avoid narrating and clicking simultaneously — doing both at once creates cognitive overload for viewers
For mistakes mid-recording: don't stop and restart the whole take. Most recorders support pause and resume. Pause, collect yourself, resume, and continue. Minor verbal errors are faster to cut in editing than re-recording five minutes of clean footage.
Step 4 — Edit and Export the Final Training Video
Once the session is captured, editing transforms raw footage into an actual training asset. Every recording needs at minimum:
- Trim the first and last 2–3 seconds of dead air
- Cut long pauses, restarts, or misstatements
- Add callouts or zoom-ins to highlight small UI elements viewers would otherwise miss
- Normalize audio if narration volume is inconsistent across the recording
For export, MP4 with H.264 encoding is the standard for LMS compatibility. Kaltura recommends H.264 High Profile in an MP4 container with Fast Start enabled for streaming. Keep file size in mind: for employees accessing training on mobile connections, a lower bitrate at consistent quality will outperform a bloated high-bitrate file that buffers.
Add closed captions before distributing. A 2022 crossover study found that making captions and transcripts available increased video viewing from 8% to 28% of content. For corporate training, that difference in viewing rate directly affects whether your workforce actually absorbs the material — not just whether they clicked play.
Key Settings That Affect Desktop Recording Quality
Most quality problems in training recordings trace back to four settings teams either misconfigure or ignore entirely.
Resolution and Frame Rate
1080p at 30fps is the baseline. Below 1080p, text and UI elements look blurry on modern monitors — this is the most common complaint about internally produced training content. If you're recording detailed software interfaces with small buttons or text fields, consider 4K to give yourself zoom headroom in editing. Frame rates below 24fps produce visible stuttering during cursor movement.
Audio Input Quality
Poor audio causes viewers to disengage faster than almost any visual issue. Follow these basics before you hit record:
- Use an external USB microphone or headset, which reduces background noise and proximity distortion compared to a built-in laptop mic
- Monitor your input gain to keep the signal consistent
- Avoid peaks above -6 dBFS to prevent audio clipping
Cursor Visibility and Highlighting
A small or fast-moving cursor loses viewers instantly. If they can't track where you're clicking, the demonstration falls apart.
- Enable cursor highlighting (colored ring or spotlight effect) in your recording software
- Slow down mouse movement during demonstrations
- Avoid moving the cursor while talking about something unrelated to the current screen position
Screen Region and Zoom Settings
Recording your full desktop when only one application is relevant adds visual clutter. Use application-window capture when possible. Tools like Camtasia and Loom support dynamic zoom. Use it to punch in on specific UI elements rather than expecting viewers to find a small button on a crowded screen.
Common Mistakes When Recording Desktop Training Videos
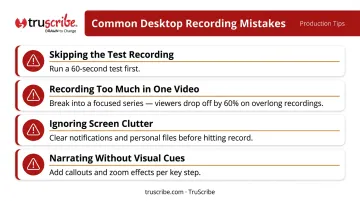
- Skipping the test recording: Wrong mic selection, room echo, and notification sounds all get caught in a 60-second test — or discovered after 20 minutes of footage
- Recording too much in one video: TechSmith's 2024 research found 60% of viewers won't finish videos over 20 minutes — break long workflows into a focused series instead
- Ignoring screen clutter: Personal files, unread email badges, or mid-recording pop-ups undermine professional credibility — and can create privacy issues if recordings are shared externally
- Narrating without visual reinforcement: Without callouts, zoom effects, or annotations, viewers are left guessing where to look — use at least one visual cue per key step
When Desktop Recording Is the Right Choice — and When It Isn't
Desktop recording works well for a specific category of training content:
- Software onboarding walkthroughs
- Step-by-step process documentation
- IT support tutorials
- Compliance demonstrations that require showing a live system interface
The format is direct evidence for observable software procedures — a 2013 study comparing animated screencasts with illustrated screenshots found screencasts had an advantage for initial procedure acquisition. For showing how software works, desktop recording is genuinely the right tool.
Where it falls short is a different kind of training problem. Complex conceptual topics, behavioral change initiatives, culture and values onboarding, employee benefits communication, and any content where the why matters more than the how — these formats ask more of the medium than screen capture can provide.
A recording of a desktop can show a viewer what to click. It cannot explain why a security behavior matters, help a new hire internalize organizational values, or make a complex benefits decision feel clear and confident.
That's where purpose-built visual storytelling earns its place. TruScribe's whiteboard animation uses the Scribology methodology — sequential hand-drawn visuals grounded in cognitive science — to direct viewer attention, reduce cognitive load, and construct mental models screen recordings can't reach. For organizations like Walmart, Medtronic, and Fidelity, where training comprehension has direct operational consequences, that difference is material.
Screen recording and whiteboard animation aren't in competition. They answer different training questions. Start by identifying what you need viewers to do after watching — then let that outcome determine the format.
Frequently Asked Questions
What is the best way to record a training video?
Plan a single clear learning outcome first, then configure your audio input and resolution before opening the recorder. Use cursor highlighting, run a short test take, and keep the recording focused on one task. The preparation matters more than which tool you choose.
What software should I use to record my desktop for training videos?
OBS Studio is free and flexible but lacks a built-in editor. Camtasia bundles a full editing timeline with annotations, captions, and LMS/SCORM export. Loom suits quick recordings with light editing needs. Built-in OS tools (Windows Snipping Tool, macOS QuickTime) handle basic captures with no authoring features.
How do I record my screen with audio for a training video?
Most screen recorders let you select an audio input source before starting — choose your external microphone rather than the system default. Enabling microphone input separately from system audio prevents background computer sounds from appearing in the recording unintentionally.
What resolution should I use when recording desktop training videos?
1080p is the minimum standard for professional training recordings. Use 4K when on-screen text or fine UI detail needs to stay sharp after zooming in during editing.
How long should a desktop training video be?
Aim for under 10 minutes per topic. MIT research on online learning found engagement drops sharply around 6 minutes, so break long processes into a series of short, focused videos rather than one extended recording.
Do I need expensive equipment to record professional training videos?
No. A dedicated USB microphone — available for under $100 — and correct display settings make the biggest quality difference. An expensive camera is not needed for desktop-only recordings where the screen content carries the training.